
We all know that the Cricut heat press is an accessory device launched by the Cricut company to help emboss designs and graphics on substrates like school bags, canvas bags, t-shirts, school bags, cosmetic bags, pouches, etc. The special feature of the Cricut Heat press that makes it different from home irons is that it is designed in such a way that it distributes even heat and pressure within a predetermined period of time.
I am sure you are here to learn how to connect the Cricut heat press with your system for the convenience of using it and updating it to the latest versions available. So read further to find out how to connect Cricut heat guide.
Cricut Heat Press Guide
To connect Cricut heat guide, we must know every tiny detail about Cricut Heat Press. So as mentioned earlier, Cricut Heat Press gives even surface temperature and pressure when you are using it to stick any design, graphics, and images on your fabrics and materials. The reason why most people prefer the Cricut Heat Press to regular irons available in their homes is that it gives firm adhesion to the finished product in very less time. Yes, the Cricut heat press is very fast and works quickly once you set the time and temperature in the machine.
How To Easily Connect Cricut Heat Guide
To easily connect Cricut Heat guide, just follow the steps given below:
- On the system or device that you are working on, first, download the Cricut Heat application from the Google Play Store or App Store. If you have your Cricut ID, sign in, or you can create a new one as well. If you have any existing Cricut.com or Design Space accounts, sign in to the application with the same login credentials.
- Now open the original packaging of Cricut Heat Press and make sure you remove every item in it. Also, you will get a pamphlet guide that will show you the recommended temperature and time for different materials you will use for adhesion.
- Then plug the Cricut heat press into a compatible power wall socket and press the “Power” button to turn it on. As soon as you turn on the heat press, you will notice the icon of the app flashing on the screen. This is to inform you that in order to press to work, you will have to connect it to the Cricut heat app to activate and register the easy press machine.
- You can manually pair your Cricut Heat Press with the Cricut Heat application, or you can pair it using Bluetooth connectivity. Or you can simply power on the press and keep your mobile or any other device within the range of seven feet, making sure that the Bluetooth of the device is turned on. By doing so, it will automatically connect.
- After that, select the Setup option in the Cricut Heat App to begin the device activation. From the list of all the available Heat Press, select your unit and tap on Connect. The app will show you connecting to Cricut Heat Press with a Bluetooth logo.
- Your Cricut Heat application will then ask to confirm the activation of Cricut Easy Press. After that, select the pop-up box to accept the Terms of Use and Privacy Policy and click on Activate.
- On your screen, you will see a status bar that will show the progress of activation. After the completion of this, you will see a success message informing you that the Cricut Heat Press is set up and ready to use.
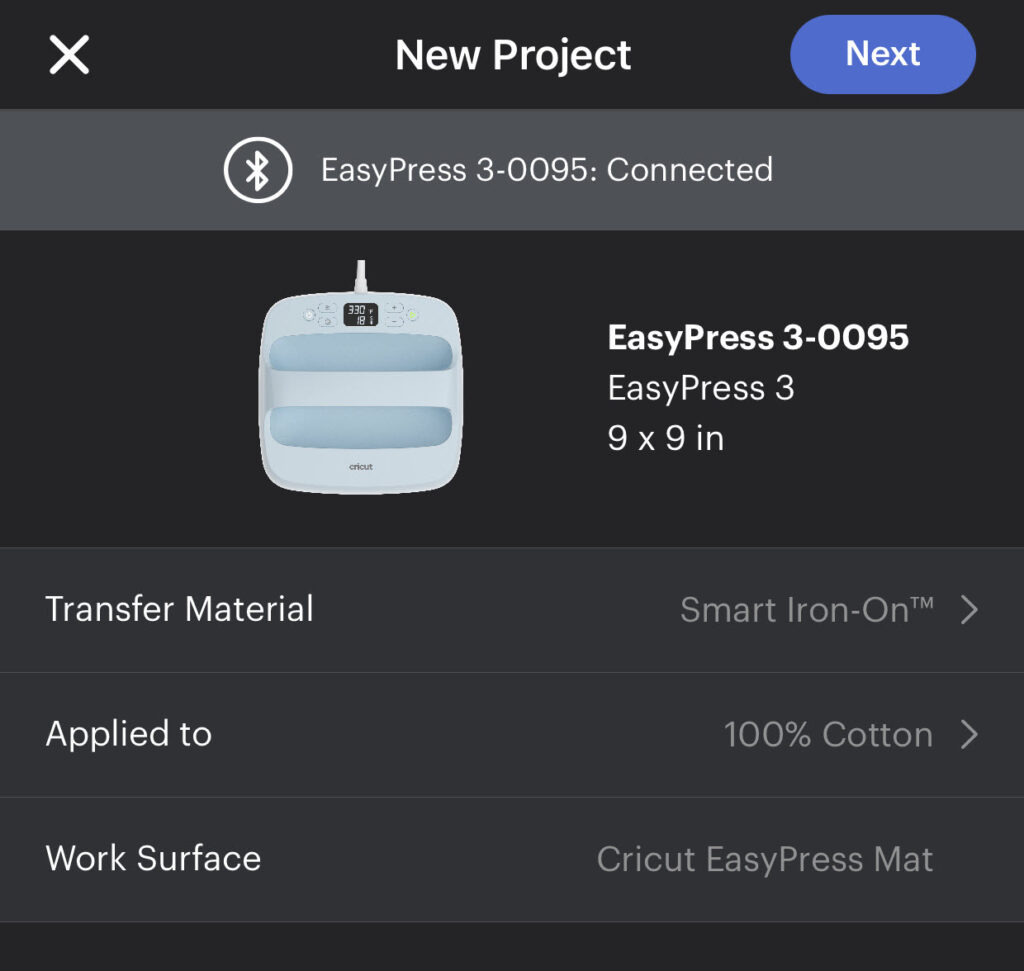
Connect Cricut Heat Guide: Start A New Project
After you have learned everything about how to connect the Cricut heat guide, you can create your first project simply by following the steps given below:
- Turn on the power button on your Cricut Heat Press once you plug it into any compatible wall outlet.
- After that, open the Cricut Heat app. You will see the screen displaying the option of multiple models of Cricut Heat Press; select the one that you are using.
- Now click on the “Start New Project” button just below the Cricut Heat Press icon.
- Select your base material and transfer material on which you will apply the Cricut Heat press, and tap on “Next.”
After all the selections have been made by you, click on “Send Settings to EasyPress” and follow all the on-screen prompts to finish your first project with ease.